
This page details the set-up of the canoe polo pitches at Dacre for Hull International.
Pitches 1 and 2
Pitches 1 and 2 have numbered buoy points. Both pitches follow the same numbering convention.
Far-side pitch and pontoon anchor points
- Buoy points 10 and 11 connect to the far side of Pitch 1.
- Buoy points 20 and 21 connect to the far side of Pitch 2.
- The pontoons also connect to these anchoring points.
Pontoon connections
- Buoy points #2 and #3 connect to the back of the pontoon.
Goal connections
As viewed from the land:
- Buoy points #4, #5 and #6 connect to the left-hand goal.
- Buoy points #7, #8 and #9 connect to the right-hand goal.
Bank-side fixing
The bank-side fixing of the pitches is done using driven posts.
New Pontoon
The new pontoon stretches from the steps in front of the cabins outwards.
It is held in place using:
- Driven posts at the lakeward end.
- Ropes running to posts on the bank-side.
Retrieval of Lake Bed Fixing Points
Pitch 2 sunken rope
The Pitch 2 rope is connected under the cabin, as shown in the relevant photo.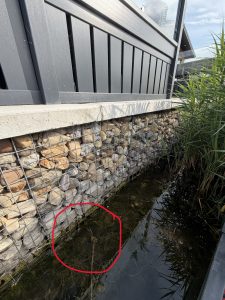
This rope runs to Buoy 12, where it connects to another rope. That rope then runs to Buoy 28, where it terminates.
Second sunken rope
The other sunken rope starts from the second marked location, as shown in the relevant photo.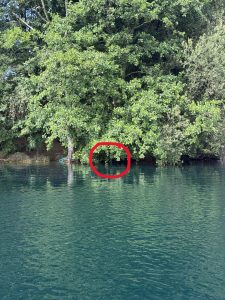
This is connected two buoys in from the above location, where it then connects to another rope.
That rope runs through the following points:
- Buoy 31 — joined
- Buoy 18 — joined
- Joined between Buoy 11 and Buoy 13
- Terminates at Buoy 17
A quick tip for when relaying the sinking rope: a person in a kayak threads the rope while 1 or 2 in a canoe manage the coil/excess rope.
Working in the Lake: Preventing Swimmer’s Itch and Skin Irritation
Before entering the water
Anyone who will be wading or handling weed should:
-
Cover as much skin as reasonably practical.
-
Wear chest waders, waterproof trousers or a drysuit where appropriate.
-
Wear long, waterproof gauntlet-style gloves rather than short gloves.
-
Ensure gloves overlap sleeves so that water and weed cannot collect around the wrists.
-
Wear suitable closed footwear if full waders are not being used.
-
Cover cuts, grazes and broken skin with waterproof dressings.
-
Check gloves and waders for holes before use.
-
Avoid entering the water with open wounds or an existing significant skin condition.
Apply a generous layer of water-resistant or waterproof sunscreen to skin that cannot be covered. Public-health guidance indicates that water-repellent products may make it more difficult for the parasites associated with swimmer’s itch to penetrate the skin, but they do not provide complete protection.
A water-resistant barrier ointment or petroleum jelly may also be used around vulnerable gaps such as:
-
The tops of gloves.
-
Sleeve cuffs.
-
Ankles.
-
The top of wading boots.
Do not apply petroleum jelly to the palms or fingers where it could make tools, ropes, boats or other equipment slippery. Barrier products should supplement protective clothing rather than replace it.
While working in the water
-
Keep time spent in shallow, weedy water to the minimum necessary.
-
Rotate tasks so that the same people are not exposed for prolonged periods.
-
Avoid kneeling or sitting in shallow water.
-
Avoid putting bare hands into weed, mud or sediment.
-
Use rakes, weed cutters or other suitable tools instead of pulling weed by hand wherever possible.
-
Replace damaged or waterlogged gloves.
-
Do not eat, drink or touch the face while wearing contaminated gloves.
-
Do not feed or encourage water birds close to the working area.
-
Stop work if a large number of people begin reporting tingling, itching or irritation.
Immediately after leaving the water
Do not allow lake water to dry naturally on the skin.
As soon as practical:
-
Remove gloves and wet protective clothing.
-
Rinse exposed skin thoroughly with clean water.
-
Dry the skin firmly and thoroughly with a clean towel.
-
Pay particular attention to the hands, wrists, forearms, ankles and legs.
-
Shower using clean water as soon as possible.
-
Change into clean, dry clothing.
-
Do not remain in wet socks, gloves, wetsuits or other clothing.
Prompt rinsing and towel-drying are widely recommended after freshwater exposure and may reduce the likelihood of a reaction developing.
Cleaning equipment
After use:
-
Rinse gloves, waders, boots and tools with clean water.
-
Remove all weed, mud and organic material.
-
Allow equipment to dry thoroughly before storing it.
-
Do not share wet gloves or clothing without cleaning them first.
-
Check the inside of gloves and cuffs for trapped weed or sediment.
-
Dispose of damaged gloves that cannot be cleaned effectively.
A clean-water rinse point, soap, towels and spare gloves should be available during event setup and dismantling.